EFEITOS
EM IMAGENS: Papel
Queimado - Retícula - Plástico - Círculos - Televisăo - Esfera - Aura - Linha Pontilhada
- Botăo 1 -
Botăo 2
EFEITOS EM
TEXTO: Texto
Sombra - Texto
Bevel - Texto Contorno 1 - Texto Contorno 2 - Texto Fogo -
Texto Gelo - TextoTinta -
Texto Glow
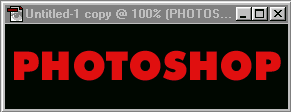
Inicie um novo arquivo RGB,
no menu File: File>New, 10X3 cm, como cor de fundo o preto.
Na barra de
ferramentas selecione a ferramenta Type Tool e digite Photoshop. Năo importa a cor desde
que năo seja branca, eu usarei vermelho. No menu Layer: Layer>Type>Render Layer.
No menu Window:
Show Layers, ative a Layer do texto e clic na setinha no canto superio direito do menu em
Duplicate Layer. Selecione Preserve Transparency na nova Layer.
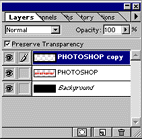
Agora na barra de
ferramentas selecione a ferramenta Paint Brush e pinte de branco.
Clic na Layer e
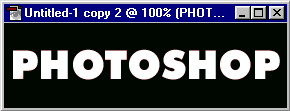
remova a marca de Preserve Transparency. Agora no menu Filter: Filter>Blur>Gaussian
Blur com Radius de 4.Vocę pode experimentar outro nş de Radius.
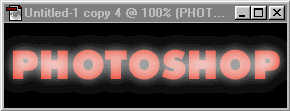
Selecione a Layer
com texto em vermelho e no menu Layer: Layer>Arrange>Bring to Front. E está pronto
seu efeito.
|


